
Generate and configure public key authentication key pair for SSH.
This day have come. You need a key pair to authenticate your user against SSH server. Fortunately, there are several tools which can can help to create this pair. The tool choice depends whether your SSH client runs on Windows or a Unix OS.
This article is my cheat-sheet ![]() and provides general information on key generation and configuration to use for SSH public key authentication, both on Windows and Linux machines.
and provides general information on key generation and configuration to use for SSH public key authentication, both on Windows and Linux machines.
However, as a developer, you (and me ![]() ) probably need a key par to use for public key authentication against a Git server. So here I dedicate a section to this topic.
) probably need a key par to use for public key authentication against a Git server. So here I dedicate a section to this topic.
Table of contents
- A little bit of background
- Generate a key pair and configure authentication
- References and credits
A little bit of background
The SSH protocol supports many authentication methods. One the most commonly used of these methods is Public Key authentication for interactive and automated connections. Public key authentication is based on asymmetric cryptography.
Here is a list of most common asymmetric key cryptographic algorithms (digital signature algorithms):
- RSA
- DSA
- ECDSA
- ED25519
Public key: SSH-2 vs one-line key format
For ssh, one can save a public key in two formats:
-
SSH-2 public key format, defined by RFC 4716.
Which looks like this:
---- BEGIN SSH2 PUBLIC KEY ---- Comment: "rsa-key-test" AAAAB3NzaC1yc2EAAAABJQAAAQEAkO01VmkGPZbLJTDU0VCjsB/Uib+/77SxGZ9T olqwnxYBLN+q5uJCXuBECKda3kfeeziAmjJVbBT9DUWX5LfsD9bkvuqkOtieKivH v+aHrSo1h/GNiKmL1bl09iZXH13qyAzSsSE50aV2BGUBeJ6J5oXeQvWRPW2DCs3E fuzWyJsGNWBboIOGyCHQIspKb065uw/DSe2zi5FYgi+Nm47MxqyJsYh/2VPE/I4S 3zKLmW0BRhrcw3H0fF85uWXwvpcAPB7gmZrEDR0l47EMKFCyBmEtHVKDa2qNqBCg 5vNVMV5MqXSONQA1cJkgPsImuYT7S1Ed5AmKOMXrO62DwGvKqw== ---- END SSH2 PUBLIC KEY ---- -
one-line public key format.
Which looks like this:
ssh-rsa AAAAB3NzaC1yc2EAAAABJQAAAQEAkO01VmkGPZbLJTDU0VCjsB/Uib+/77SxGZ9TolqwnxYBLN+q5uJCXuBECKda3kfeeziAmjJVbBT9DUWX5LfsD9bkvuqkOtieKivHv+aHrSo1h/GNiKmL1bl09iZXH13qyAzSsSE50aV2BGUBeJ6J5oXeQvWRPW2DCs3EfuzWyJsGNWBboIOGyCHQIspKb065uw/DSe2zi5FYgi+Nm47MxqyJsYh/2VPE/I4S3zKLmW0BRhrcw3H0fF85uWXwvpcAPB7gmZrEDR0l47EMKFCyBmEtHVKDa2qNqBCg5vNVMV5MqXSONQA1cJkgPsImuYT7S1Ed5AmKOMXrO62DwGvKqw== rsa-key-test
Linux users are more familiar with one-line format, while SSH-2 format is supported in some commercial versions of SSH, for example by Tectia by ssh.com. For more information for one-line format please refer to section ‘OpenSSH public key format’.
Private key
The private key is usually encrypted when it is stored on your local machine, using a passphrase of your choice. In order to generate a signature, the ssh client must decrypt the key, so you have to type your passphrase. Optionally, you can use an authentication agent to type a passphrase of the private key only once. An authentication agent holds decrypted private keys and generates signatures on request.
Generate a key pair and configure authentication
Windows users
Generally, Windows users are on the client side of the communication.
You can generate your authentication key pair on your Windows machine and then install your public key on the server side.
It worth mention that with Windows 10 WSL/WSL2 (if its available) you can use exactly the same tools for key generation as on Linux machine. If you need OpenSSH keys both on server and client (Windows) side you can skip this section and go directly to ‘Linux users’. To start Bash in Windows 10 you can use the built-in Command Prompt or PowerShell.
Otherwise, you can configure and use PuTTY in SSH-client mode to access a remote Linux server.
To find out how to install your public key onto the remote server, pleases refer to section ‘’.
Generating public key with Putty Key Gen
PuTTY Key Generator is a tool which generates private/public key pairs to be used for public-key authentication. PuTTY supports the following set of algorithms:
- RSA (SSH-2 and SSH-1 variants)
- DSA
- ECDSA
- ED25519
Steps to generate:
- Start PuTTY gen Tool
- Choose your preferred algorithm (‘Type of key to generate’) and the key length (‘Number pf bits in a generated key’)
- Enter a pass-phrase on your choice into ‘Key passphrase’ and ‘Confirm passphrase’.
- Click ‘Generate’ and move your mouse within the blanc area of the Putty Key Generator window
- Save public key in SSH-2 format by clicking ‘Save public key’
- Save public key in one-line format: copy and paste the key representation within ‘Public key for pasting into Open SSH authorized_keys file’ text area.
- Save private key in in PuTTY’s native format (*.PPK) by clicking ‘Save private key’
PuTTY native format file (*.PPK) holds the key pair, so each time you load a private key (via ‘Load’ button), the corresponding public key is also available.
PuTTY: Windows SSH client
PuTTY is an SSH and telnet client, developed originally by Simon Tatham for the Windows platform.
For PuTTY to use your private key, you need to configure it in Connection->SSH->Auth panel, ‘Private key file for authentication’ field. The key must be in PuTTY’s native format (*.PPK). When establishing a connection, PuTTY will ask for a passphrase of the key.
Pageant: Windows authentication agent
PuTTY’s authentication agent is called Pageant. When you start a Windows session, you can start Pageant and load the private key into it (typing the passphrase once). For the rest of the session, you can use PuTTY any number of times and Pageant will automatically generate signatures without you having to do anything. When you close your Windows session, Pageant shuts down, without ever having stored your decrypted private key on disk.
To allow PuTTY to use Pageant the ‘Attempt authentication using Pageant’ checkbox in Connection->SSH->Auth panel must be checked.

Pageant uses PuTTY native format file (*.PPK).
Git bash and Pageant
As a Windows user you probably use Git for Windows with its Bash emulation. You can configure Pageant to load the private key and then Git for Windows to use PuTTY as ssh client.
First, configuring Pageant:
- Launch pageant.exe from your PuTTY suite.
- Add you key and enter your passphrase (if the key has one):
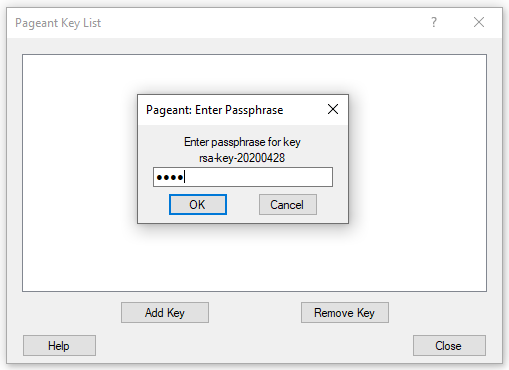
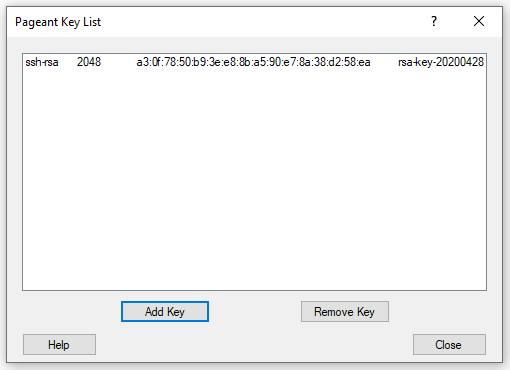
- Add
GIT_SSHenvironment variable. Well, it’s in French but you get the idea :)
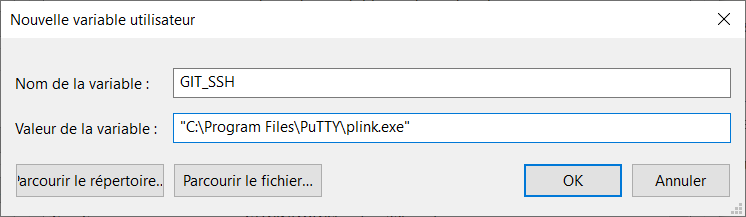
What will happen after that is that Git will detect that you are using PuTTY’s plink SSH variant.
And each time you establish an ssh connection (by running git commands in Git Bash terminal), plink will ask Pageant for the key to use.
You can find more information in Git documentation.
Git Bash and ssh-agent
Git Bash has a small selection of Unix tools, including ssh-agent.
Git Bash can happily use ssh-agent to load a private key.
You can either configure ssh-agent manually or use a little script to load your key each time you launch Git Bash.
Please refer to ssh-agent: OpenSSH authentication agent section for details.
Installing the public key on the remote server from Windows machine
Let’s imagine we don’t have OpenSSH on Windows. Well, if we did, we could do something like the following from Windows command line:
C:\> type %HOMEPATH%\.ssh\id_rsa_gh.pub | ssh login@remote "cat - >> ~/.ssh/authorized_keys"
Or we could use Unix utilities from Gib BASH (see [Installing the public key on the remote server from Unix machine]).
But we don’t have OpenSSH, so in this case the following steps should be followed:
- Launch PuTTY and open a session to the remote server using your login/password.
- On the remote server insert the value of the public key into the ~/.ssh/authorized_keys file. For example using
cat:$ cat 'ssh-rsa AAAAB3NzaC1yc2EAAAABJQAAAQEAkO01VmkGPZbLJTDU0VCjsB/Uib+/77SxGZ9TolqwnxYBLN+q5uJCXuBECKda3kfeeziAmjJVbBT9DUWX5LfsD9bkvuqkOtieKivHv+aHrSo1h/GNiKmL1bl09iZXH13qyAzSsSE50aV2BGUBeJ6J5oXeQvWRPW2DCs3EfuzWyJsGNWBboIOGyCHQIspKb065uw/DSe2zi5FYgi+Nm47MxqyJsYh/2VPE/I4S3zKLmW0BRhrcw3H0fF85uWXwvpcAPB7gmZrEDR0l47EMKFCyBmEtHVKDa2qNqBCg5vNVMV5MqXSONQA1cJkgPsImuYT7S1Ed5AmKOMXrO62DwGvKqw== rsa-key-test' >> ~/.ssh/authorized_keys
Please mind the ‘»’ usage, which will append at the end of the file. ‘>’ will replace the contents.
Now if everything is configured correctly, next time you launch your PuTTY ssh session to the remote server, or use git commands, the ssh session will be established using your private key.
Troubleshooting
plink fails to add git server key to the cache the fist time when running git command
Symptoms: git command hangs after Store key in cache? (y/n) y.
$ git fetch
Looking up host “github.com” for SSH connection
Host key fingerprint is:
ssh-rsa 2048 16:27:ac:a5:76:28:2d:36:63:1b:56:4d:eb:df:a6:48
The server’s host key is not cached in the registry. You
have no guarantee that the server is the computer you
think it is.
The server’s rsa2 key fingerprint is:
ssh-rsa 2048 16:27:ac:a5:76:28:2d:36:63:1b:56:4d:eb:df:a6:48
If you trust this host, enter “y” to add the key to
PuTTY’s cache and carry on connecting.
If you want to carry on connecting just once, without
adding the key to the cache, enter “n”.
If you do not trust this host, press Return to abandon the
connection.
Store key in cache? (y/n) y
Remedy: add the key from PuTTY UI or using plink directly.
Example of adding the server key using plink:
>plink -ssh git@github.com
The server’s host key is not cached in the registry. You
have no guarantee that the server is the computer you
think it is.
The server’s rsa2 key fingerprint is:
ssh-rsa 2048 16:27:ac:a5:76:28:2d:36:63:1b:56:4d:eb:df:a6:48
If you trust this host, enter “y” to add the key to
PuTTY’s cache and carry on connecting.
If you want to carry on connecting just once, without
adding the key to the cache, enter “n”.
If you do not trust this host, press Return to abandon the
connection.
Store key in cache? (y/n) y
Using username “git”.
Access granted. Press Return to begin session.
Linux users
On Linux we could be as often on the ssh-client side as on the server side. The most popular implementation of SSH protocol for Unix-family OS is OpenSSH. OpenSSH client and server daemon are included in most distributions for Unix-family OS.
OpenSSH public key format
OpenSSH defines its own public key format, so called one-line format, which is not a standard format in cryptography world. OpenSSH format is used to store client public authentication keys in specific files used by OpenSSH.
OpenSSH server daemon (sshd) documentation defines one-line format as following:
Public keys consist of the following space-separated fields: options, key type, base64-encoded key, comment. The options field is optional.
So SSH-2 public key format can be easily converted into one-line format:
<key type (ssh-rsa|ecdsa-sha2-nistp256|...)> <ssh-2 key value without spaces> <key comment>
Generating key pair with ssh-keygen
OpenSSH comes with its own tool for generating key pairs. ssh-keygen is able to generate a key using one of the following algorithms:
- RSA
- DSA
- ECDSA
- ed25519
As you have noticed, these are the same algorithms as for PuTTY Gen.
Steps to generate an RSA key:
- Open a terminal.
- Type
ssh-keygen -t rsa -b 4096 -C "your_comment" - Enter the fully qualified path to your key pair. By pressing enter you accept the default location proposed:
Enter file in which to save the key (~/.ssh/id_rsa):
- Enter a passphrase (twice) of your choice to protect you prove key, when prompted. To leave the key without the passphrase (not really recommended), just press enter:
Enter passphrase (empty for no passphrase): Enter same passphrase again:
This will generate public and private key pair. The name of the pair is
You can use any of the algorithms supported. All you need to check is if your SSH server supports it.
ssh-agent: OpenSSH authentication agent
ssh-agent is an authentication agent from OpenSSH tools suite. Let’s see how we can configure it :)
Adding the key manually (in the beginning of your login session):
- Start the agent in a background mode:
eval "$(ssh-agent -s)"Agent pid 1475
- Add your SSH private key to the ssh-agent:
ssh-add <fully qualified path to your key>. If your key is protected with the passphrase, you will be asked for it.
For example for my GitHub account.
ssh-add ~/.ssh/id_rsa_gh
Enter passphrase for /home/rennes/.ssh/id_rsa_gh:
Identity added: /home/rennes/.ssh/id_rsa_gh (/home/rennes/.ssh/id_rsa_gh)
Now till the end of your session, there is no need to type a passphrase for your key. Nice! But could be better. You can use a script which will load the key automatically once you are logged in. There are plenty of examples of scripts on the internet. Here is the one from the GitHub help documentation:
env=~/.ssh/agent.env

agent_load_env () { test -f "$env" && . "$env" >| /dev/null ; }

agent_start () {
    (umask 077; ssh-agent >| "$env")
    . "$env" >| /dev/null ; }

agent_load_env

# agent_run_state: 0=agent running w/ key; 1=agent w/o key; 2= agent not running
agent_run_state=$(ssh-add -l >| /dev/null 2>&1; echo $?)

if [ ! "$SSH_AUTH_SOCK" ] || [ $agent_run_state = 2 ]; then
    agent_start
    ssh-add
elif [ "$SSH_AUTH_SOCK" ] && [ $agent_run_state = 1 ]; then
    ssh-add
fi

unset env
You can add this script into your .bashrc to be launched each time you open your terminal.
To be sure that you are not leaving any ssh-agent running, you can run :
ssh-add -D
ssh-agent -k
To properly stop the agent or to get rid of the running instances you can add a trap to your .bashrc which will be executed each time the shell exists:
trap 'test -n "$SSH_AGENT_PID" && eval `/usr/bin/ssh-agent -k`; rm ~/.ssh/.agent.env;' 0
Converting *.PPK into OpenSSH private key
If for any reason you’ve created your pair with PuTTY Gen and would like to use it with OpenSSH client, no problem! PuTTY can convert your private key into OpenSSH compatible private key.
Steps:
- Load your private key
- Click ‘Conversions’ menu and choose ‘Export OpenSSH key’
If you open the file of the private key in OpenSSH format, its contents should looks like this:
-----BEGIN RSA PRIVATE KEY-----
MIIEogIBAAKCAQEAkO01VmkGPZbLJTDU0VCjsB/Uib+/77SxGZ9TolqwnxYBLN+q
5uJCXuBECKda3kfeeziAmjJVbBT9DUWX5LfsD9bkvuqkOtieKivHv+aHrSo1h/GN
iKmL1bl09iZXH13qyAzSsSE50aV2BGUBeJ6J5oXeQvWRPW2DCs3EfuzWyJsGNWBb
oIOGyCHQIspKb065uw/DSe2zi5FYgi+Nm47MxqyJsYh/2VPE/I4S3zKLmW0BRhrc
w3H0fF85uWXwvpcAPB7gmZrEDR0l47EMKFCyBmEtHVKDa2qNqBCg5vNVMV5MqXSO
NQA1cJkgPsImuYT7S1Ed5AmKOMXrO62DwGvKqwIBJQKCAQBeAaYOiVAn8xv8crOO
sNjg8g1SbopWS7ElYG2ZvkkNPrSnfFMt+ovqg6HAbI3390Q0QFNq8Ddos6sPhxZq
2CprI5tLZ8R5MpAbWqsUsTVpZ3yrNOYvId4pxGeK6G/c/qYg5bkY8vUSXXz77n1+
rAZsA85wn0lz9AH5K4ZgKuwvF3cBk7hdjSlPktGElXjFSf1stpSDOsu3rojkLmv6
OX2lAmhnv040Vx2saHrZ2FJIVvvNm26WwsKQ7PfBRuL2f+2fpmBDNCW+KkWEHUsB
CsU3uI4zLpdFxcsGTrfoxYlVrNHtBDIiyQf+D+rqojDRslOlWQ/9CRzIrJJ7NwBZ
P2QtAoGBANl4kCUcKFzp2nrmtouGOu4prL3y1H672cYuTZ/f2NzT8NwvQqIsghGq
/E7f8EvgmLutL3SLsrWyB0vUDsLvsrMAW2u9D8LSTwtE51NA0qtjFkvZtk0B45My
uSn1OBrkZd6XIKnbQdDGE3jvl97reu55AkJeZXZ7pb39fwxQ/LcDAoGBAKqaYc+e
zDTY76ePrU9jlw+JyYsMyTq/NSn0GlyZ8qOUV/c3qZpxdhA9G1vvahYz+Na78R25
/agq6pqbXzqS3xQ6+EsfmpxgTO9zHI/wjWvtY7C0tGKIoLbLnhtq4AaTjf/E7Wxk
Hc2tgnJ6xZHgFyEzZY2KNgddFiDAOaw7LVk5AoGBAIcvRNjMUHEbvynNr76D33Fz
2hU2FWOJh1+EkR4xM8eKqnsInwrdZZxHsZjQZPDlj1/oMkGHRZOKV5AAXDP8yQd8
wzUif2tEdlMc/n/cL+3/UwyOQOPC52lW4c35TGO+aNZ5nq7GkLI18G3FXmf6KdKC
krOidmw/Bin+cZII1HHDAoGAIEa4jxA0eLNrnD3G16sOvcAfNfuABDIDI5ziZIvT
9W8Xj6K/OOUIf5zbqZv/UE8FkGi+6fLBSVQ6OOz2VzCLEapKpm3DTgRhlRXHIiaX
S8UgsrpnUOlqg3KhXyIOtSLVrO3nuo97QpZyoAljpfn2ib2dl1F/1+EtsytJLmwP
f5UCgYEAqOVUuO2O27HPq/KVeEGKR8Eg/rL4b5fRgqUMvGJO9w27iKRasKyxJlIo
AA5u19WU6z8n8jmf1Kwkmw0gi8oZqK+iXGCjTGYnDeCRWt8fFf1X/BFVvu8GRIKA
b4yJaElZ7t/4eHsSuKeczVotZGfrWS7T6dWG3tNdRyONyDK0xio=
-----END RSA PRIVATE KEY-----
Installing the public key on the remote server from Unix machine
First you need to copy your public key to the remote server and then add it to the list of authorized keys. You can do it using your login/password authentication:
$ ssh-copy-id -i ~/.ssh/id_rsa_gh.pub login@remote
login@remote’s password:
Or
$ cat ~/.ssh/id_rsa_gh.pub | ssh login@remote 'cat - >> ~/.ssh/authorized_keys'
login@remote’s password:
Voilaaaa! Finally it’s ready to be tested:
$ ssh login@remote
At this point, if your didn’t configure ssh-agent, you should be asked for your passphrase (if you have one, which is highly recommended ;)).
Phew, done! You are very courageous person to read this article till the end 🦸. Thanks for reading!
References and credits
- PuTTY Help documentation
- Public key cryptography: RSA keys By Leonardo Giordani
- Open SSH wikibook.
- Connecting to GitHub with SSH
- WSL2 will be generally available in Windows 10, version 2004
- Using ssh-agent with ssh by Mark A. Hershberger(weblog)
Comments